How to Add a Handle to a Kids - Camp - or - Classroom Basket
If you have extra reed, and if your students are Older, and especially- if you have extra TIME, you can consider letting them twist a handle onto their basket.
Note: this isn't for little kids.
Note: your Camp Kit and Classroom kit do NOT guarantee having enough reed for handles.
This is simply a fun add-on when you have a small group or a class of older or creative kids with better than average fine motor skills- and some extra reed to play around with.
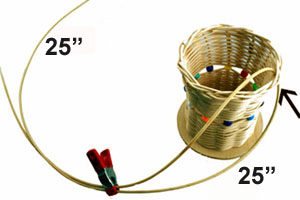 1. Cut a strand of wet reed 50" long. Thread the strand under the border at arrow.
Pull up the reed so that one side is 25" long and the other is 25" long- that is, evenly spaced from the center.
Contents are copyright V I Reed & Cane Inc. If you are reading these entries from a location other than Basketweaving.com, that means that the source has stolen our copyrighted content.
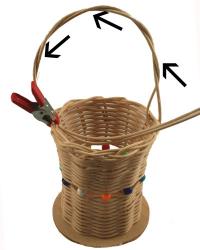
2. Bring the two lengths together and twist the wet reed 3 or 4 times.
Hold the twist from uncoiling, and carry the two ends under the border on the opposite side of the basket,
from Outside to Inside of the basket.
(This is where the red clamp is.)
Adjust the reed so that the highest part of the handle loop is 4" tall from the border.
If you make it too tall, you won't have enough reed to twist back across the handle.
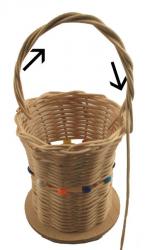
3. Twist the two strands of reed back over the handle in the opposite direction,
back to where you first began your handle.
You've twisted over the handle twice.
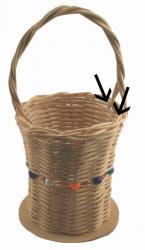
4. Separate the two strand ends and weave each end of reed under the border (over-under).
Weave one on the left, and one on the right, side of the reed to evenly distribute the reed thickness.